The app options panel allows to set the appropriate options for the app that you are developing. The app options panel is divided by sections to made easy to navigate between these sections using the menu that is placed at the left of the app options panel.
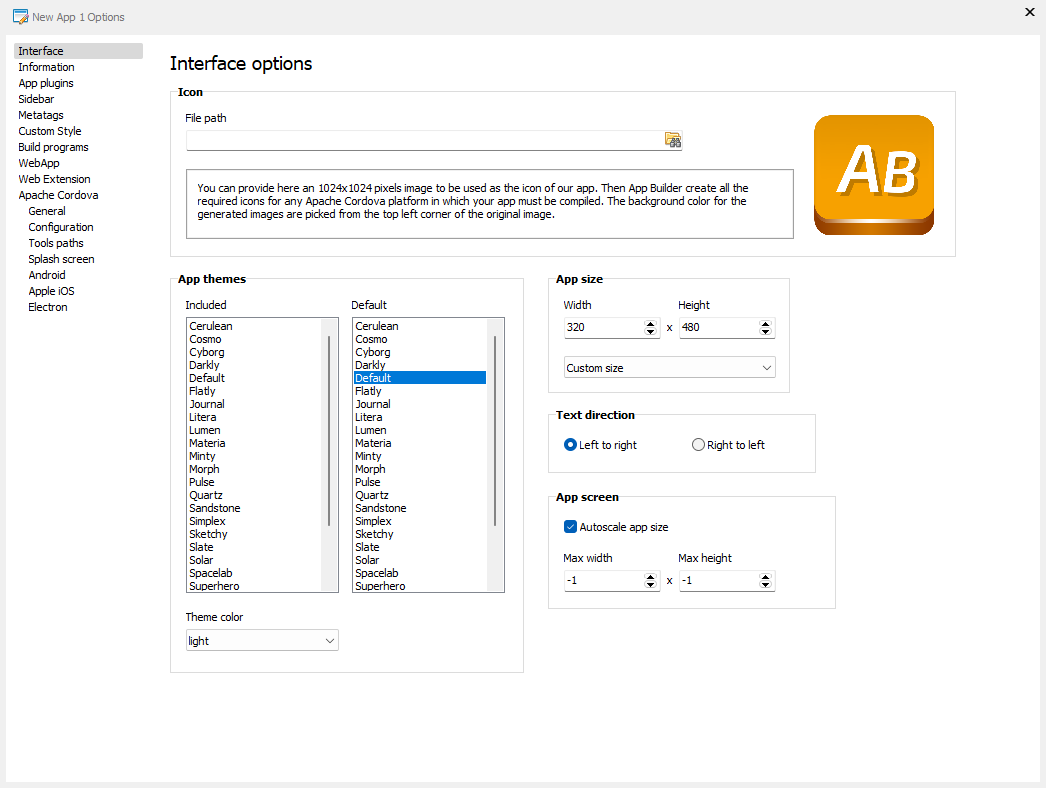
Below you can see the app Interface options window. After the image you can get information about all the app options in the Interface section.
Apps options - Interface - App icon
Use the app icon editbox folder button to select the icon to be used in the app. It's recommended to use a 1024x1024 pixeles image here. DecSoft App Builder creates several icons for Apache Cordova based in the icon image that you provide here.
Apps options - Interface - App themes - Included
Select one or more app themes from the themes included list in order to be available for the app. At runtime, you can find the available themes in the app Themes property, and, also change between app themes by using the app setAppTheme() method.
Apps options - Interface - App themes - Default
Select one app theme from the themes default list in order to be established as the theme when the app start. At runtime, you can find the current theme in the app Theme property, and also the available themes in the app Themes property, and, also change between app themes by using the app setAppTheme() method.
Apps options - Interface - App theme color
Select one app theme color from the list in order to be established as the theme color when the app start. At runtime, you can find the current app theme color using the getAppThemeColor() app method and you can also change it using the setAppThemeColor() app method.
Apps options - Interface - App Width
With the app width what you establish in the app options are the app designer size for all the app views and app dialogs. The app designer size is related with the app "fixed" and "scaled" styles and the Autosize the app size option. Use the listbox below the width and height editboxes in order to set a predefined size for the app, or just fill the width and height editboxes with your desired values.
Apps options - Interface - App Height
With the app height what you establish in the app options are the app designer size for all the app views and app dialogs. The app designer size is related with the app "fixed" and "scaled" styles and the Autosize the app size option. Use the listbox below the width and height editboxes in order to set a predefined size for the app, or just fill the width and height editboxes with your desired values.
Apps options - Interface - App Text direction
You can establish here the text direction for the app, which can be "left to right" (by default) or "right to left". You can use the app TextDirection property to know the current app text direction, and, it's also possible to change the app text direction at runtime by using the appSetTextDirection() method.
The Autoscale app size option (which is checked / used by default) establish the app "scaled" style when the app start. Uncheck this checkbox if you want to establish the "fixed" style for the app. You can change between the "fixed" and the "scaled" styles at runtime, by using the app setAppFixedStyle() method and the app setAppScaledStyle() method. Take a look also at the app styles help topic.
Apps options - Interface - App screen - MaxWidth
The app MaxWidth option is taken in consideration if the Autoscale app size option is checked. This option limit the app scale width, as you can see described in the app styles help topic.
Apps options - Interface - App screen - MaxHeight
The app MaxHeight option is taken in consideration if the Autoscale app size option is checked. This option limit the app scale height, as you can see described in the app styles help topic.
Apps options - Information
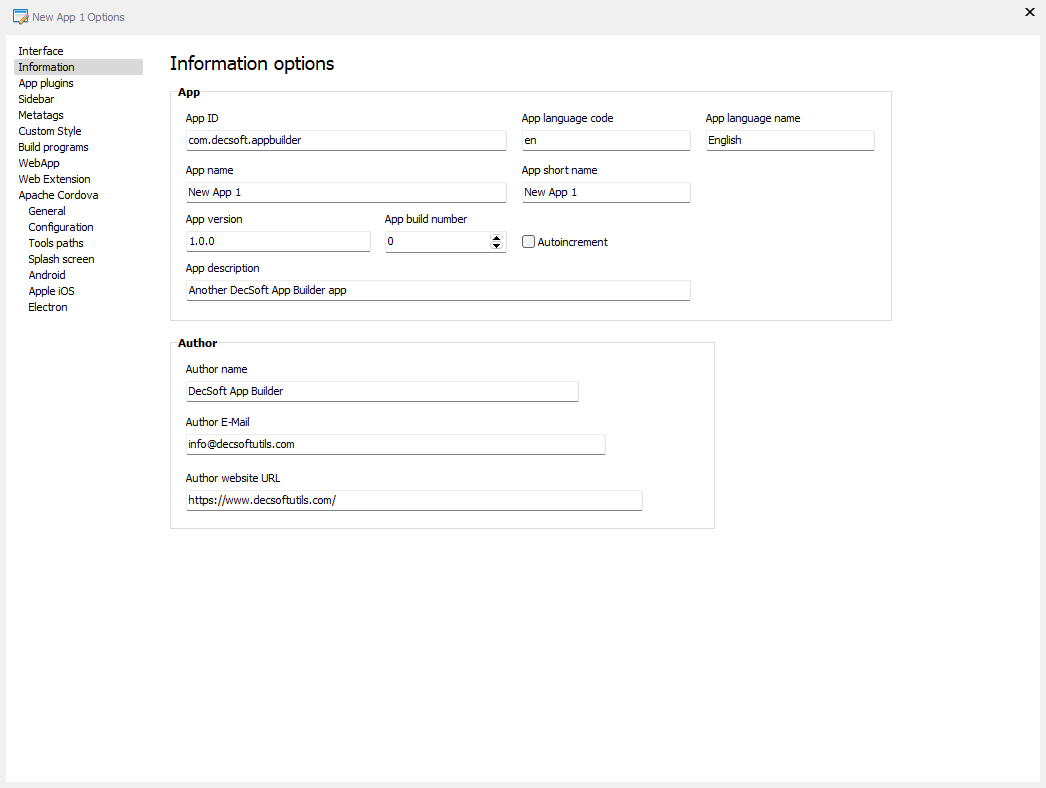
Below you can see the app Information options window. After the image you can get information about all the app options in the Information section.
Apps options - Information - App ID
The app ID option establish the ID for the app, which is used in certain platforms like Android, for example, to maintain the app well updated. The app ID is suposed to be unique per every app. You can access to the app ID at runtime by using the app ID property.
Apps options - Information - App Language
The app Language option establish the language code for the app (by default "en" for "English"), which is used to establish the app HTML "lang" attribute, but, also internally when translate the apps. You can access to the app Language at runtime by using the app Language property.
Apps options - Information - App LanguageName
The app Language name option establish the language name for the app (by default "English"). You can access to the app Language at runtime by using the app LanguageName property.
Apps options - Information - App Version
The app Version option establish the version for the app. You can access to the app version at runtime by using the app Version property.
Apps options - Information - App Name
The app Name option establish the name for the app, which is used, for example, to set the browsers title, but also when our app is listed, or below the app icon, in other platforms. You can access to the app name at runtime by using the app Name property.
Apps options - Information - App ShortName
The app ShortName option establish a short name for the app, which is used, for example, in the Android platform, when, due to space limitations, is more convenient to use a short version of the app name. You can access to the app name at runtime by using the app ShortName property.
Apps options - Information - App BuildNumber
The app BuildNumber option set a build number for the app compilation. You can check the Autoincrement checkbox in order to auto increment the build number on every app compilation. You can access to the app name at runtime by using the app BuildNumber property.
Apps options - Information - App Description
The app Description option set a line of text with an small description of the app. This description is used, for example, in the app HTML metatags. You can access to the app name at runtime by using the app Description property.
Apps options - Information - App Author Name
The app Author Name option is used, for example, to be placed in the appropriate HTML metatag. You can access to the app name at runtime by using the app AuthorName property.
Apps options - Information - App Author Email
The app Author Email option is used, for example, to be placed in the appropriate HTML metatag. You can access to the app name at runtime by using the app AuthorEmail property.
Apps options - Information - App Author URL
The app Author URL option is used, for example, to be placed in the appropriate HTML metatag. You can access to the app name at runtime by using the app AuthorUrl property.
Apps options - Sidebar
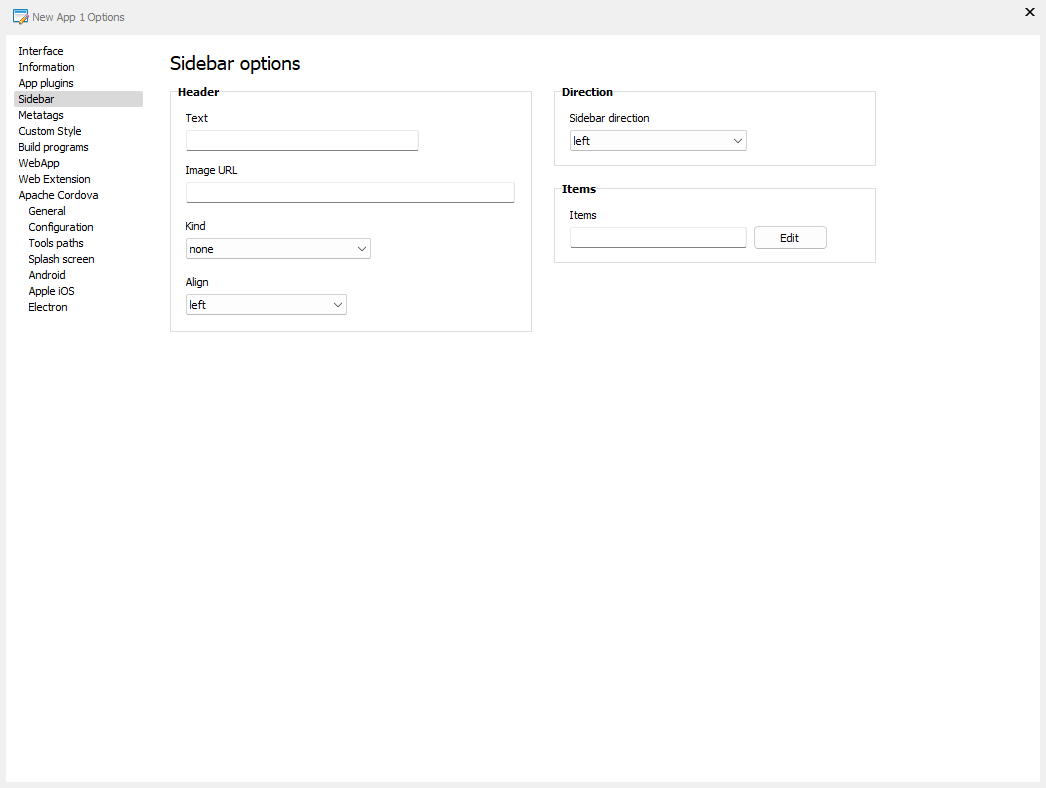
Below you can see the app Sidebar options window. After the image you can get information about all the app options in the Sidebar section.
Apps options - Sidebar Header
Set this option to a litle text to be show at the header of the optional app sidebar. The app sidebar is optional, and so the sidebar header. You can access to the app sidebar header at runtime by using the app app.sidebar.header property.
Apps options - Sidebar image URL
Set this option to an image URL to be show at the header of the optional app sidebar. The app sidebar is optional, and so the image URL. You can access to the app sidebar image URL at runtime by using the app app.sidebar.imageUrl property.
Apps options - Sidebar Header kind
Set this option to the kind (color) to be used in the header of the optional app sidebar. The app sidebar is optional, and so the header kind. You can access to the app sidebar header kind at runtime by using the app app.sidebar.headerKind property.
Apps options - Sidebar Header Align
Set this option to the align ("left", "center", "right") to be used in the header of the optional app sidebar. The app sidebar is optional, and so the header align. You can access to the app sidebar header kind at runtime by using the app app.sidebar.headerAlign property.
Apps options - Sidebar Items
Use the "Edit" buttons to establish the app sidebar items and subitems at designtime by using the sidebar items dialog. You can access to the app sidebar items and subitems at runtime by using the app app.sidebar.items property.
There is a Sidebar sample app included with the installation of DecSoft App Builder. Take a look to see the above dialog in action!
Apps options - Metatags
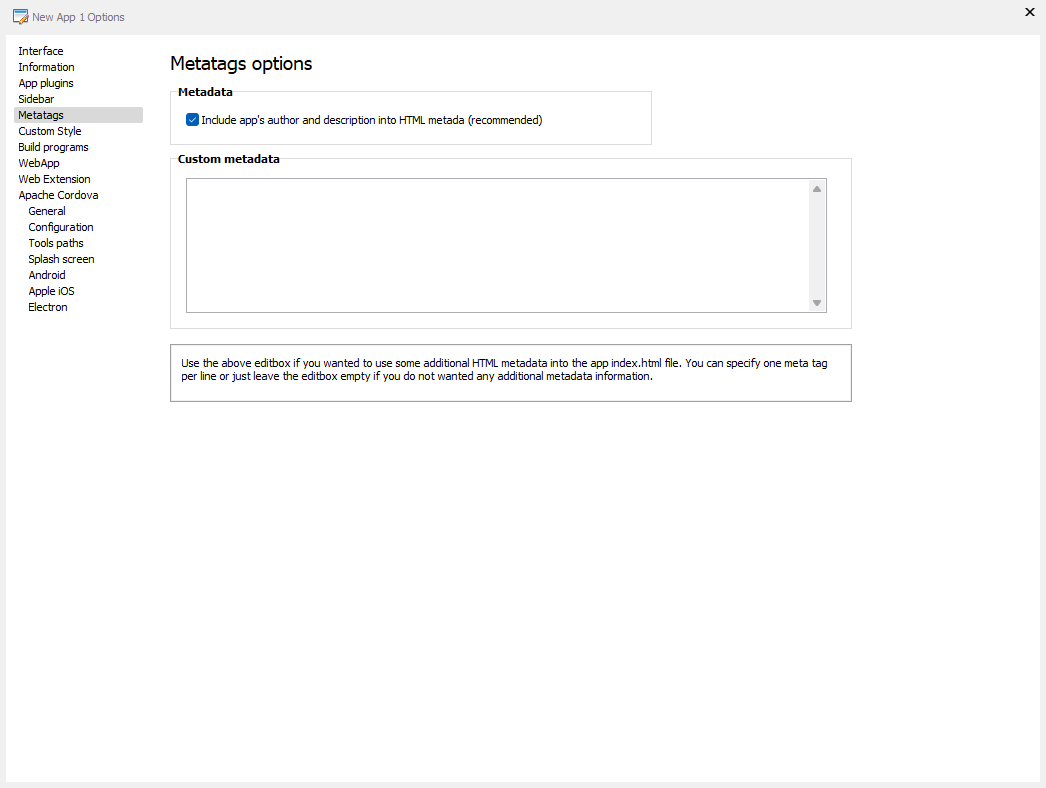
Below you can see the app Metatags options window. After the image you can get information about all the app options in the Metatags section.
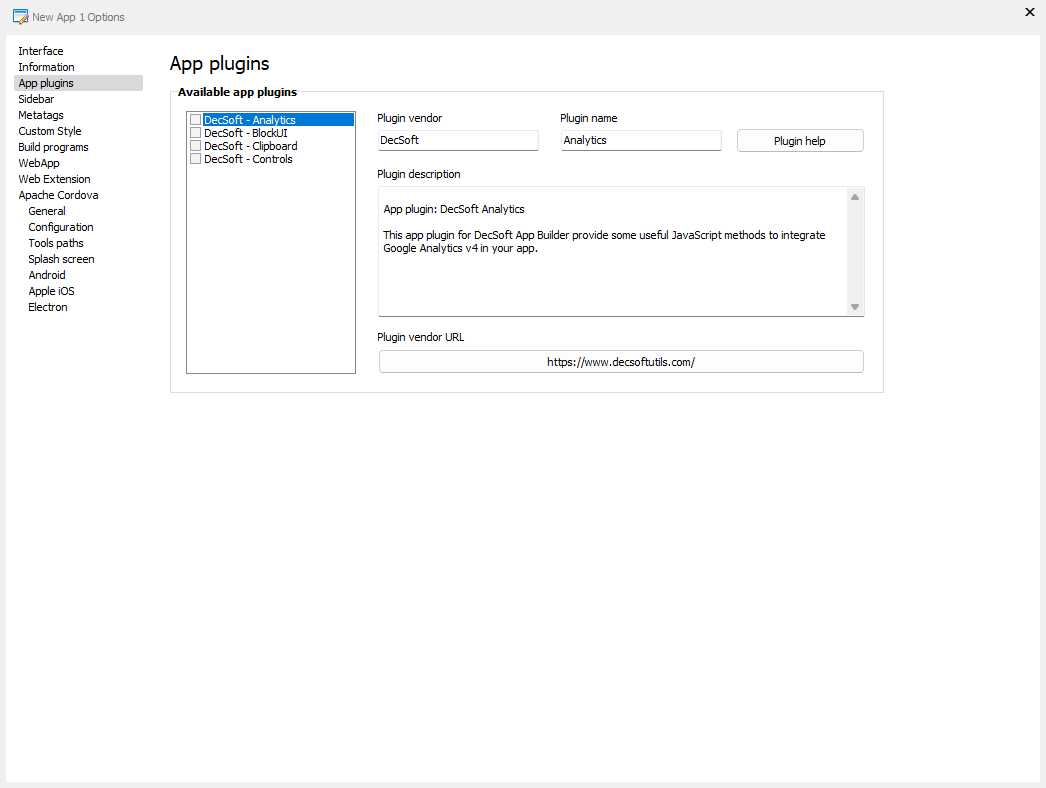
Apps options - App plugins
Below you can see the app plugins options window. After the image you can get information about all the app options in the Metatags section.
Apps options - App plugins - Information
From the app plugins options you can see the list of available app plugins, and, also check the plugins, in order to be included in the app. Sometimes you no need to check an app plugin, for example, if the plugin has controls, and, you add some of that controls into the app, then the plugin become automatically checked and available to be used.
If an app plugin do not have any controls (but provide other stuff, like app methods), you explicitily need to check the plugin in the above options, in order to put it available to be used at designtime and at runtime.
The available plugins are also integrated in the IDE help, as you can see in the index of contents. However, this specific plugins help are only available in the IDE and not in the online version of the help.
If you are interested in develop an app plugin for DecSoft App Builder, you are welcome! Here is the documentation that you must learn and follow.
Apps options - Metatags - Metadata
Check the checkbox (it's checked by default) to include the app author information and the app description using the appropriate app HTML metatags.
Apps options - Metatags - Custom metadata
You can use the Custom metadata app option to add more HTML metatags to be included in the app HTML.
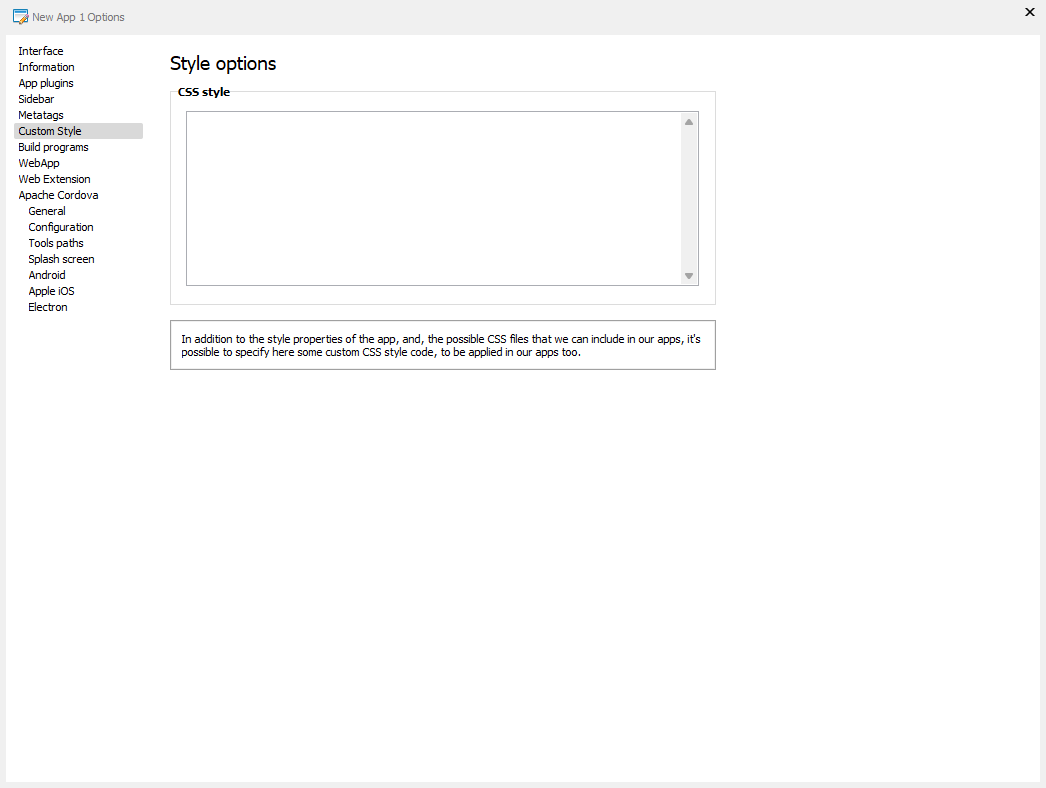
Apps options - Custom Style
Below you can see the app Custom Style options window. After the image you can get information about all the app options in the Custom Style section.
Apps options - Custom Style - CSS style
In addition to the CSS stylesheets that you can include in the app by using the app files manager and the custom style that you can set by using the IDE controls style inspector, it's also possible to use the app custom style option to place some CSS code to be applied in the entire app.
You can set the custom CSS style for the app using the above app option editbox, but, there is another way from the app designer, by using the right click contextual menu, as you can see in the below GIF image:
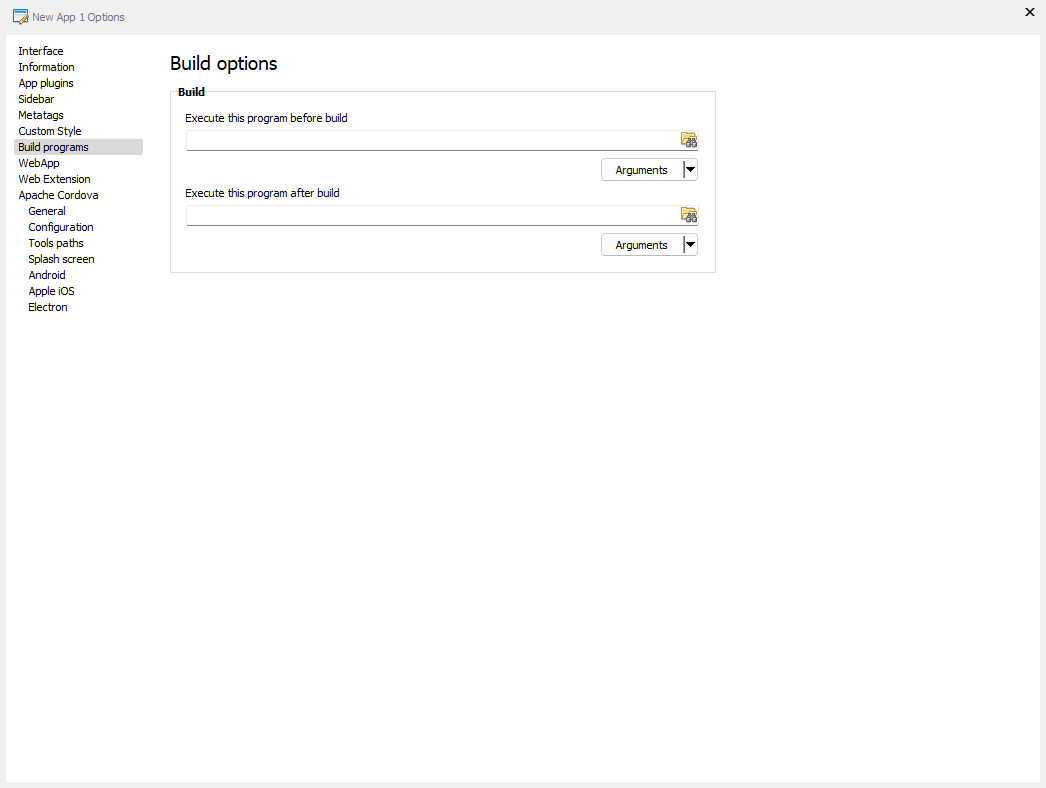
Apps options - Build programs
Below you can see the app Build programs options window. After the image you can get information about all the app options in the Build programs section.
Apps options - Build programs - Before and after build
You can use the Build programs app options to establish executable programs (or BAT, or CMD files) to be executed before and after the app has been successfully compiled. Use the arguments listboxes to pick some arguments (like the app project file path or the app output directory path) to be send to the referred executable programs.
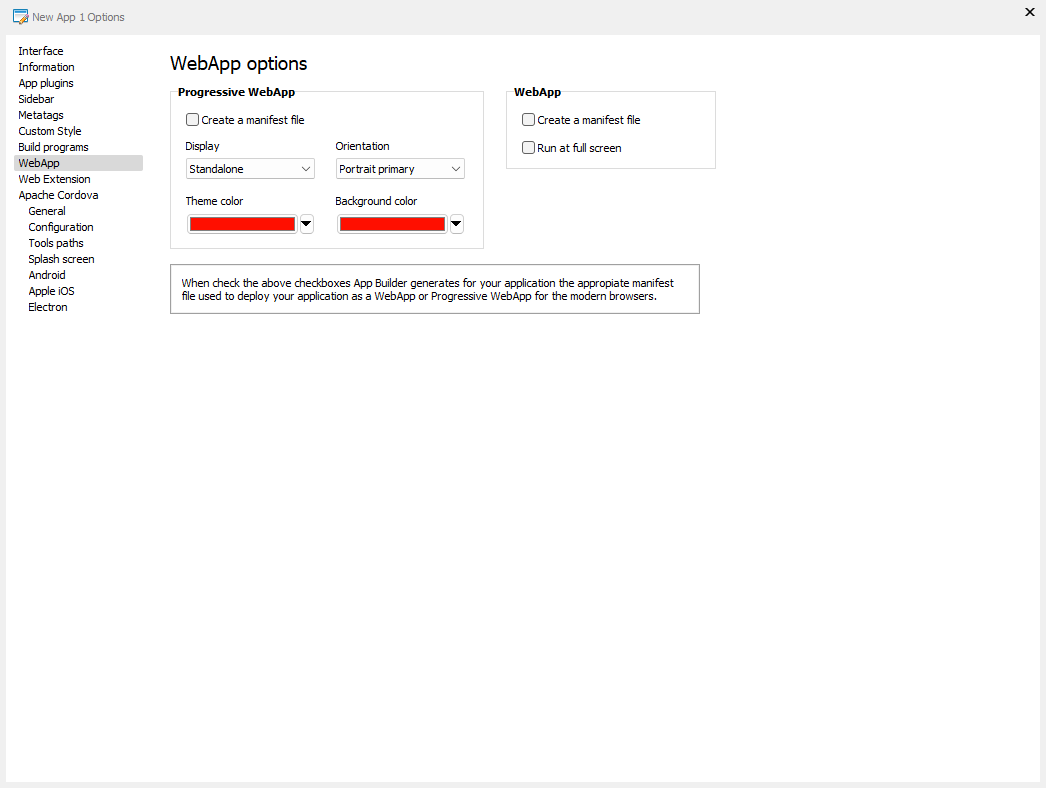
Apps options - WebApp
Below you can see the WebApp options window. After the image you can get information about all the app options in the WebApp section.
Apps options - WebApp - WebApps and Progressive WebApps
You can use the WebApp options to create the appropriate stuff (some manifest files, for example) to made your app ready to be installed in modern browsers and devices, without downloading first from any app store.
Commonly the browsers vendors detect the app manifest and offers to the user a way to install the app, basically place an app icon in the device home screen. Then, when the app is launch from that icon, the options that you can establish here are applied.
Note that we are not talking here about the hybrid apps that we can also creates with DecSoft App Builder and the help of Apache Cordova. A WebApp is running in a browser and is served from certain HTTP server. When the user use the app icon, the appropriate app URL is loaded.
Hybrid apps, however, can be really downloaded and installed from the different app stores, or just from your own website, and can access to the device information and capabilities too, like if they are native apps.
To prepare your app to be available as a WebApp and Progressive WebApp just check the "Create manifest" checkboxes, and set the WebApp and Progressive WebApp options as you wanted. Then when the app is compiled, DecSoft App Builder creates the right manifest files to be used.
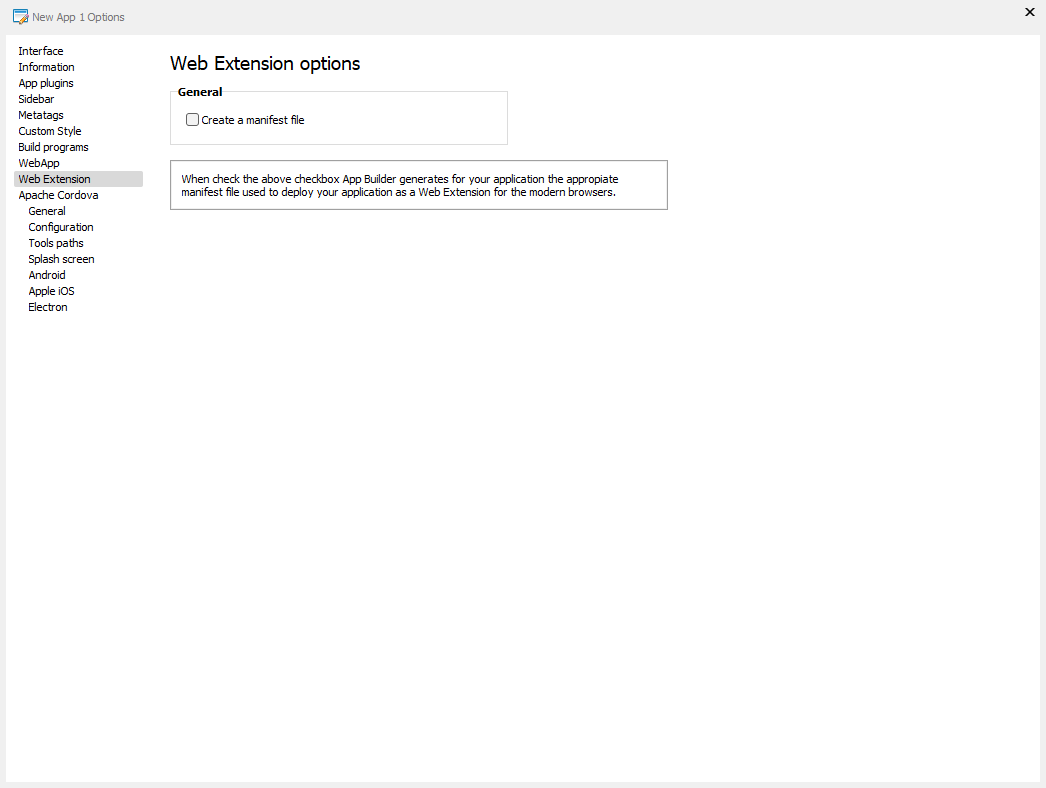
Apps options - WebExtension
Below you can see the WebExtension options window. After the image you can get information about all the app options in the WebExtension section.
Apps options - WebExtension - WebExtension
You can check the "Create a manifest file" so DecSoft App Builder creates the appropriate app manifest which allows the app to be installed in modern browsers as a plug-in or add-on, that is, as a WebExtension. The installed WebExtension app can then be show by the user clicking in the provided browser toolbar icon.
It's important to note, that, with the introduction of the Web Extensions manifest version 3, the DecSoft App Builder apps deployed as Web Extensions, must run inside a kind of sandbox. This means that our apps, running as Web Extensions, cannot access the browser's local storage nor interact with the browser's page's content.
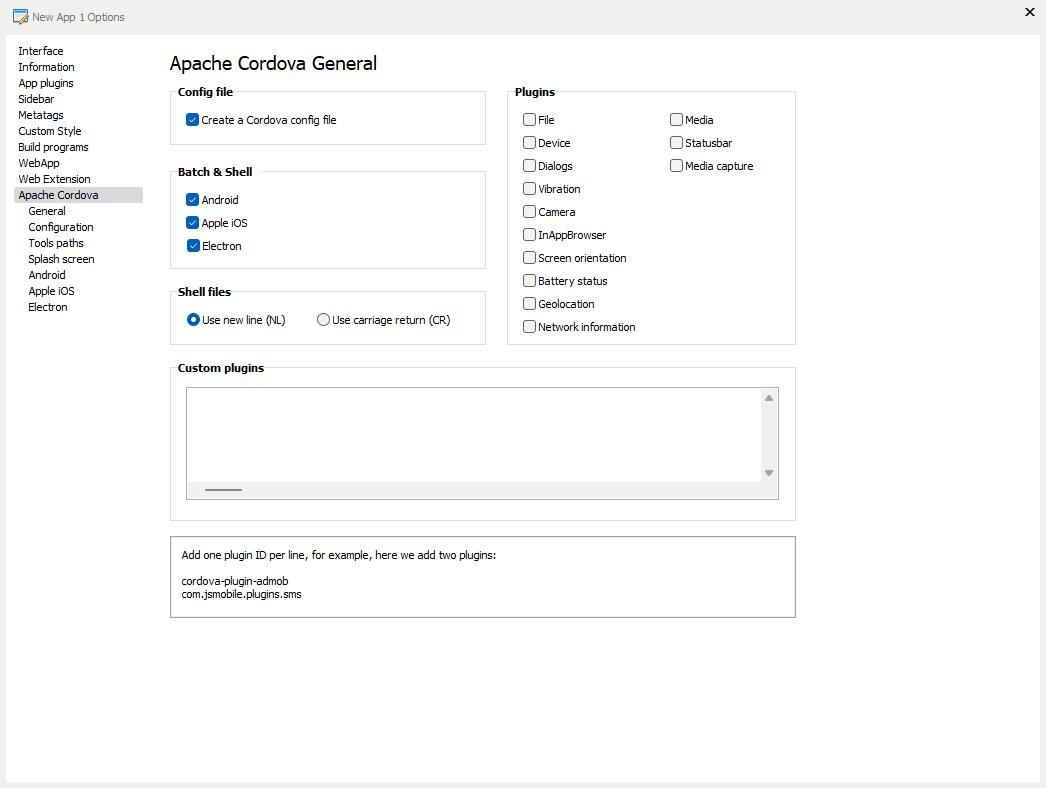
Apache Cordova options - General
Below you can see the Apache Cordova - General options window. After the image you can get information about all the app options in the Apache Cordova - General section.
Apache Cordova options - General - Config file
If you want to deploy your app as an hybrid app for platforms like Android, Apple iOS and Microsoft Window, then check the "Create a Cordova config file" checkbox. Doing that, DecSoft App Builder prepare the appropriate stuff (configuration file, icons, splash screens and more) to made it possible.
Apache Cordova options - General - Batch & Shell
You can check as many platforms as you wanted here, so DecSoft App Builder creates the right Batch and Shell files in order to properly compile the app with Apache Cordova. You can then execute these Batch files in Microsoft Windows, and, in the same way, execute the prepared Shell files in Apple Mac OS.
Note that Shell files are only prepared for the iOS and Electron platforms, since these platforms are the supported ones in Apple Mac OS. Please, read the Apache Cordova help topic for more information and details about these Batch and Shell files.
Apache Cordova options - General - plugins
Check as many plugins as you wanted to be included in the app when compile it with Apache Cordova. These plugins are the Apache Cordova officially supported plugins.
When you check a Cordova plugin here, DecSoft App Builder prepares the right plugin JavaScript variables and methods to be ready for use, and, include the Cordova plugin to be installed when compile the app. For example, take a look at the below GIF image: you can see how when the Cordova File plugin is checked, the IDE code editor show the appropriate variables and methods that the plugin provides to you. See here the Apache Cordova Javascrit APIs integration.
Take a look at the Apache Cordova help topic in order to learn more about the integration of DecSoft App Builder with Apache Cordova.
Apache Cordova options - General - Shell files
Select from the Shell files group if DecSoft App Builder must use the NL (New Line) character or the CR (Carriage Return) character when creates the Shell files for Apple Mac OS. By default the NL (New Line) character is used, but, you can change it to CR (Carriage Return) if needed.
Apache Cordova options - General - Custom plugins
In addition to the Apache Cordova plugins which are supported "out of the box", you can use the the Custom plugins editbox to specify other Apache Cordova plugin to be used in the app. Just add one plugin ID per line in the referred editbox and that plugin will be referred in Apache Cordova configuration file and the created Batch and Shell files.
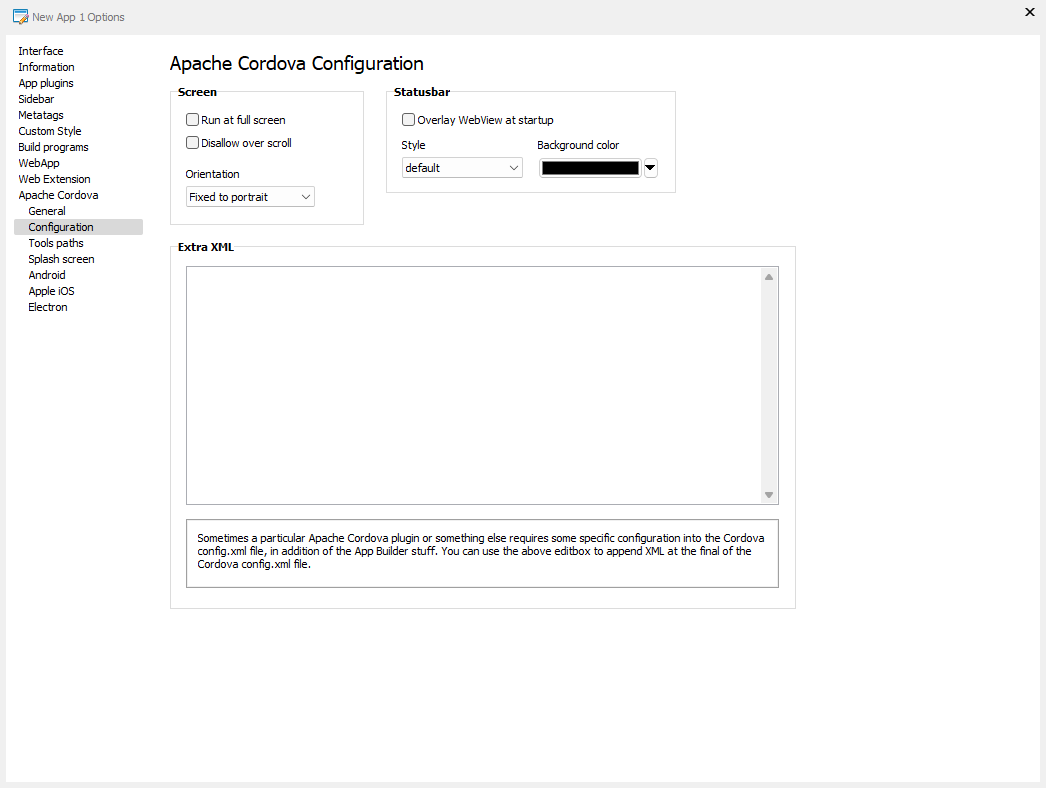
Apache Cordova options - Configuration
Below you can see the Apache Cordova - Configuration options window. After the image you can get information about all the app options in the Apache Cordova - Configuration section.
Apache Cordova options - Configuration - Screen
Check the "Run at full screen" checkbox if you want that your app run in a full screen manner, without any statusbar, for example. Run the app in full screen mode can be atractive, however, it's not the regular way in which the app run, so take careful and use this feature if your app really need to work in a full screen mode, like if you are developing certain game, for example.
Check the "Disallow over scroll" if you don't want the interface to display any feedback when users scroll past the beginning or end of content. On iOS, overscroll gestures cause content to bounce back to its original position. on Android, they produce a more subtle glowing effect along the top or bottom edge of the content.
Check the "Overlay WebView at startup" checkbox to make the statusbar overlay on top of your app. Ensure that you adjust your styling accordingly so that your app's title bar or content is not covered. Uncheck the checkbox to make the statusbar solid and not overlay your app.
Select one of the available statusbar styles from the listbox, and, finally the default statusbar background color to be used. You can change the color and perform several other actions over thee statusbar by using the Apache Cordova Statusbar plugin.
Apache Cordova options - Configuration - Extra XML config
If you need to add some XML configuration into the Apache Cordova configuration file, here is the place. Some Apache Cordova plugins can require specific configuration which can be set in the Apache Cordova configuration file. Always that you need to add some XML code into the Apache Cordova configuration file, use the above Extra XML configuration editbox.
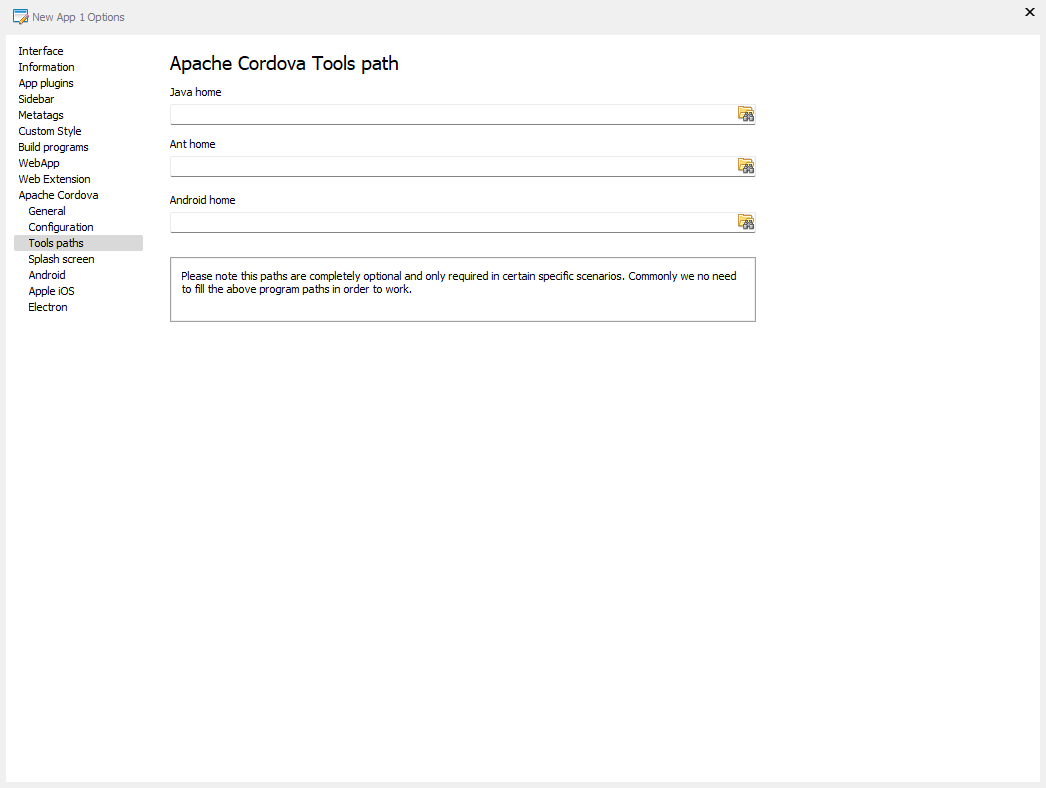
Apache Cordova options - Tools Paths
Below you can see the Apache Cordova - Tools Paths options window. After the image you can get information about all the app options in the Apache Cordova - Tools Paths section.
Apache Cordova options - Tools Paths
In principle, you can ommit these options, that is, only if you need to specify special paths for the Java home, the Ant home and the Android home, you can use the above editboxes to do it.
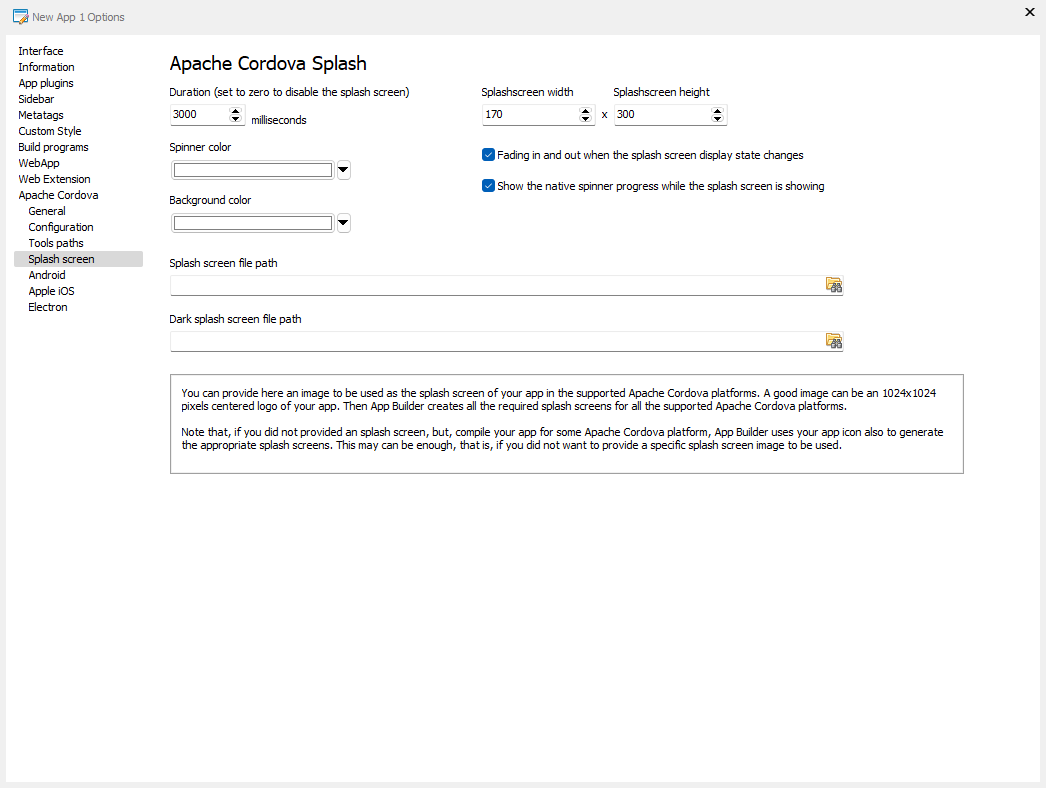
Apache Cordova options - Splash screens
Below you can see the Apache Cordova - Splash screens options window. After the image you can get information about all the app options in the Apache Cordova - Splash screens section.
DecSoft App Builder creates several icons for Apache Cordova as well several splash screens for Apache Cordova. Here you can set splash screens specific options, for example, you can set the duration, in milliseconds, that the splash screen is visible when your app starts. By default the splash screen appear during 3000 ms (three seconds). You can set the duration to "0" (zero) in order to avoid the splash screen usage.
Pick also the splash screen Spinner color. Check the Fading in and out... checkbox to apply a fade effect to the splash screen when it's show and hide. Check the Show the native spinner... checkbox to show the splash screen spinner: remember that you can set the color of that spinner too.
Determine the splash screen pixels width and height and the splash screen background color. These specific options are only effective for the Apache Cordova "Browser" and "Electron" platforms.
Last, but not least, choose an image file to be used as your app splash screen. A 1024x1024 image size can be good here, then DecSoft App Builder creates several splash screens for Apache Cordova based in your provided image. Note that, if you did not provide an image here, the app icon is used for the app splash screen. Choose also a dark splash screen to be used for Android and iOS when the dark mode is used: if you did not provide a dark splash screen image, DecSoft App Builder uses the normal splash screen image instead.
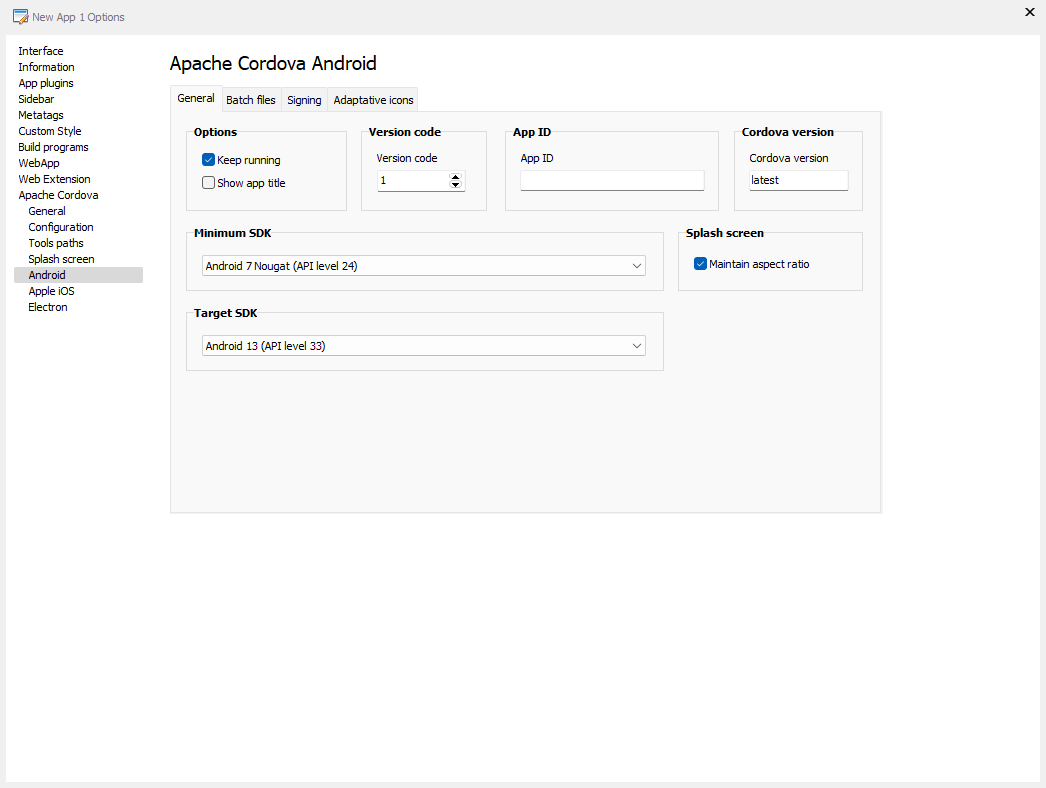
Apache Cordova options - Android platform
Below you can see the Apache Cordova - Android platform options window. After the image you can get information about all the app options in the Apache Cordova - Android platform section.
The "Keep running" option checkbox determines whether the application stays running in the background even after an app Pause event fires. Uncheking this checkbox does not kill the app after an app Pause event, but simply halts execution of code within the Cordova webview while the app is in the background.
Apache Cordova options - Android platform - Show title
The "Show title" option checkbox determines if the app title must appear at the top of the screen. This is "false" (unchecked) by default.
Apache Cordova options - Android platform - Version code
Sets the version code for the application. This version code must be increased when everytime the app is uploaded to the Play Store.
Apache Cordova options - Android platform - App ID
Set here a specific app ID for Android. This value overrides the general app ID. If this value is not set the general app ID is used.
Apache Cordova options - Android platform - Cordova version
You can specify here the version of Cordova Android that you want to use. You can set this option to a specific version, but also you can set this option with the "latest" word (without quotes), which means that you want to use the latest version of Cordova Android.
If set check the Splash screen "Maintain aspect ratio" checkbox, the splash screen drawable is not stretched to fit screen, but instead simply "covers" the screen, like CSS "background-size:cover". This is very useful when splash screen images cannot be distorted in any way, for example when they contain scenery or text. This setting works best with images that have large margins (safe areas) that can be safely cropped on screens with different aspect ratios. Take a look at the Splash screens options.
Apache Cordova options - Android platform - Min Android SDK
Choose from the listbox the minimum Android SDK API to be used for your app. This option sets the "minSdkVersion" attribute of the "uses-sdk" tag in the project's "AndroidManifest.xml" file.
Choose from the listbox the target Android SDK API to be used for your app. This option sets the "targetSdkVersion" attribute of the "uses-sdk" tag in the project's "AndroidManifest.xml" file.
Use the debug and release Signing groupboxes to provide the required stuff in order to properly sign your app APK file. This is mandatory if you want to deploy your APK in the Google Store and probably other stores. When you compile the app, the signing information was stored in the right JSON files, which is later used by Apache Cordova when compile the app.
You can create Key Store files to signing your apps using the DecSoft App Builder provided Key Store tool.
In addition to the app icon that you can provide, you can specify here additional icons for the Android platform. These optional adaptative icons are intended to be used in the supported Android versions (Android 9+) and are just ignored in versions who don't support these kind of icons. DecSoft App Builder generates the right platform icons based in your provided adaptative icons.
Apache Cordova options - Apple iOS platform
Below you can see the Apache Cordova - Apple iOS platform options window. After the image you can get information about all the app options in the Apache Cordova - Apple iOS platform section.
Apache Cordova options - Apple IOS Platform
Specify the "Bundle version" for the Apple iOS platform, as well the "Deployment target" and the "Target device". You can provide here an app ID specifically to be used in the Apple iOS platform. This app ID overrites the general app ID.
Set the "Signing" groupboxes controls in order to provide the information to sign your IPA files. When you compile the app, the signing information was stored in the right JSON files, which is later used by Apache Cordova when compile the app.
Check the "Use the modern WKWebView" checkbox (checked by default) in order to use the modern WKWebView for our iOS apps. You can uncheck this option in order to use the old WebView for iOS, but, take in consideration, that, currently the Apple Store only accept apps compiled with the modern WKWebView.
In the Cordova version edit box you can specify the version of Cordova iOS that you want to use. You can set this option to a specific version, but also you can set this option with the "latest" word (without quotes), which means that you want to use the latest version of Cordova iOS.
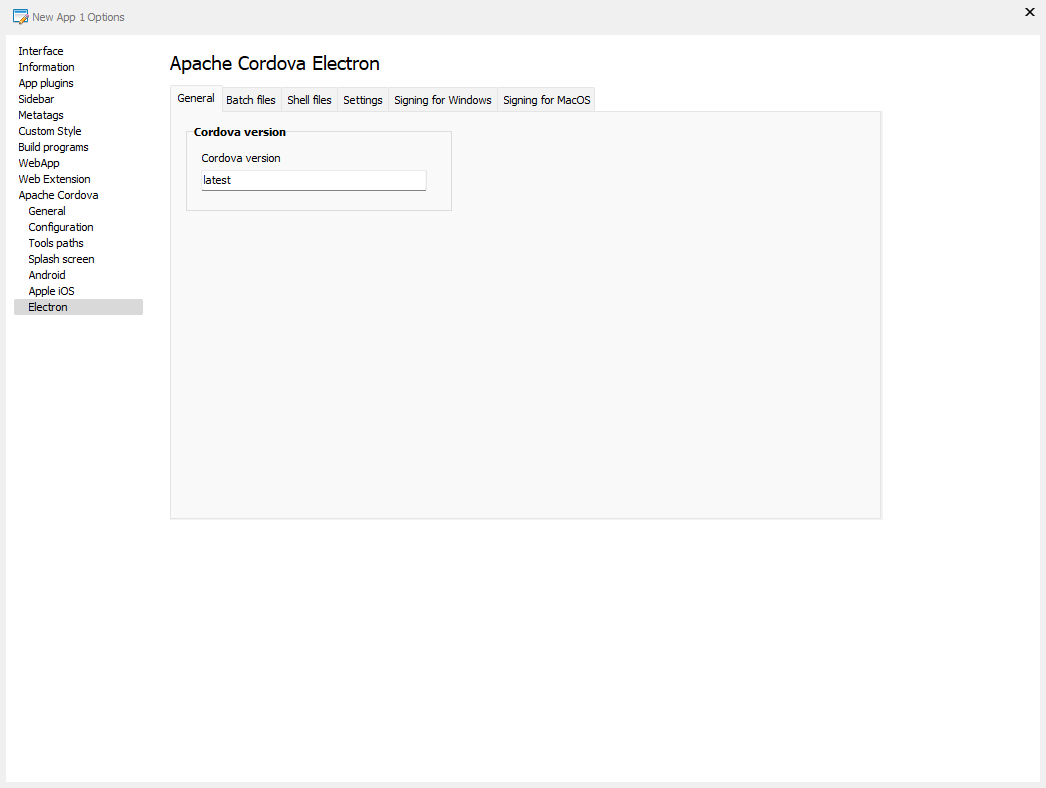
Apache Cordova options - Electron platform
Below you can see the Apache Cordova - Electron platform options window. After the image you can get information about all the app options in the Apache Cordova - Electron platform section.
Apache Cordova options - Electron platform
The Apache Cordova Electron platform is quite interesting, since allows to deploy the app in the Microsoft Windows and Mac OS platforms. You can use the Apache Cordova Windows platform to deploy your apps in the Universal Windows platform, but with the Apache Cordova Electron platform, what you get are executable files of your app, ready to be deployed in the regular Microsoft Windows platform.
Use the "Settings" editbox to place the JSON settings for the Electron platform. There are lot of posible options to be used, as you can see by clicking the "Electron's Docs" link. Then you can use the "Signing" groupboxes to sets the information in order to sign your apps for both Microsoft Windows and Apple Mac OS platforms. When you compile the app, the signing information was stored in the right JSON files, which is later used by Apache Cordova when compile the app.
By default NodeJS modules are not integrated in your Electron's app. If you set to "true" the "nodeIntegration" setting, then you can use the "window.nodeRequire" variable instead of "require", in order to deal with the Node JS modules: